
Step 4: Statements
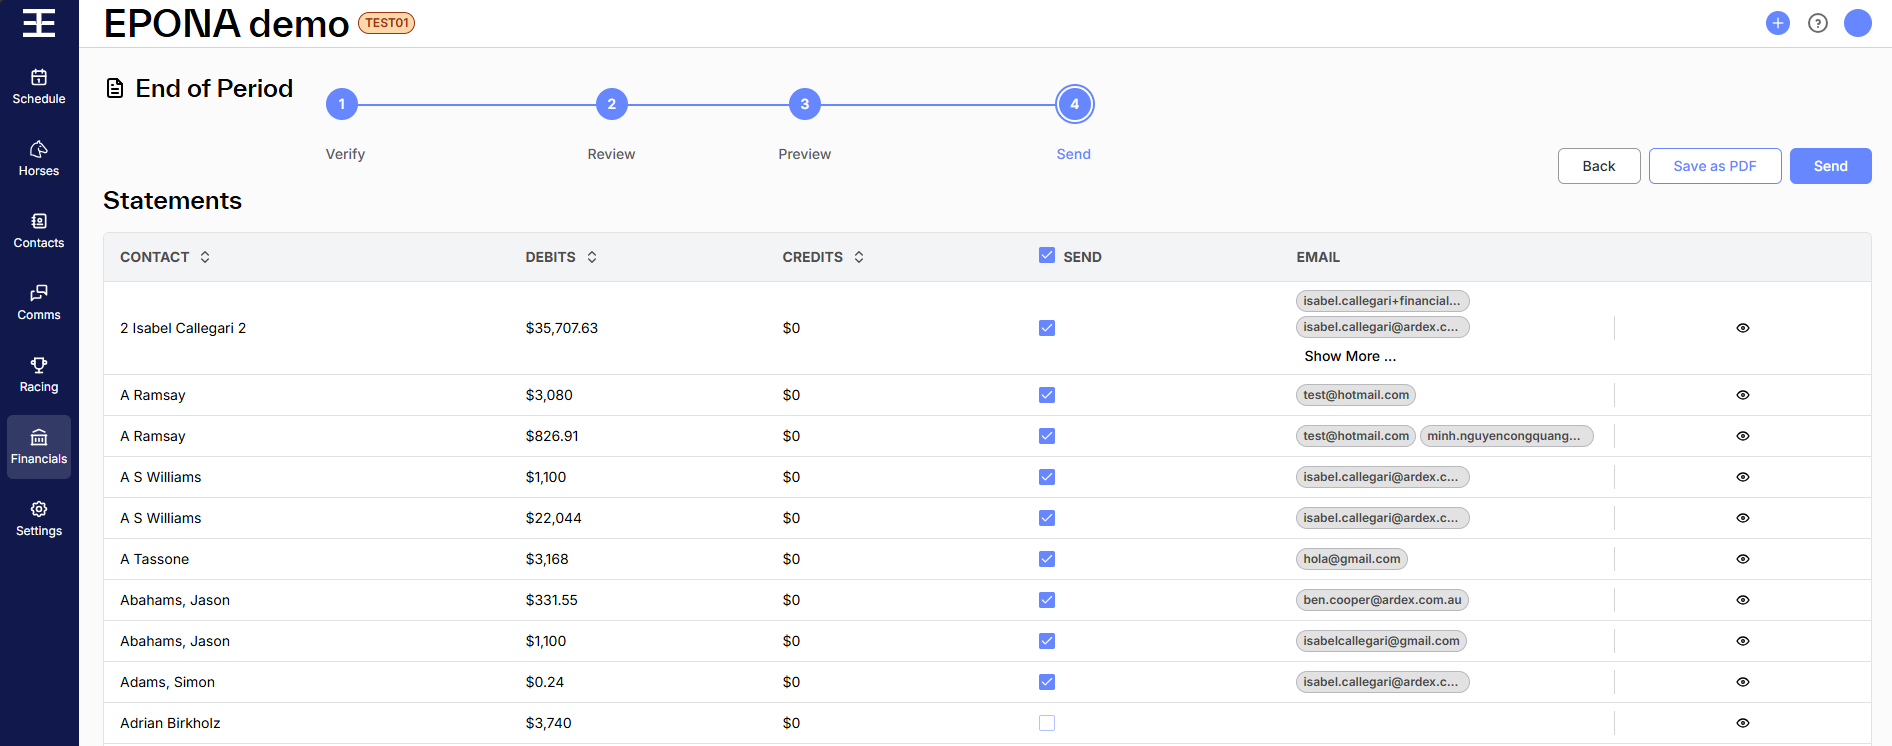
The Send step is the last step of End of Period, where you review account statements for each contact and choose which statements to send via email. The page is headed Statements.
Note - This step only appears if statements are turned on for your workspace. If they are not, End of Period finishes at the Preview step.
What You'll See
Statements Table Each row represents a statement for one contact who has new invoices in this run, or who already has a Draft statement. It shows:
| Column | Description |
|---|---|
| Contact | The billable contact's name |
| Debits | Charges added during the period |
| Credits | Payments or credits received (shown in brackets if negative) |
| Send | Checkbox to include or exclude this statement from the email send |
| The email address(es) the statement will be sent to, or Action Required if the contact has no email address | |
| Eye icon | At the right end of each row - opens a preview of that contact's statement as a PDF, so you can check it (hover over the icon to see View) |
How to Use This Screen
Selecting Statements to Send
- Every contact with an email address is ticked in the Send column when you arrive
- Tick the checkbox to include a statement in the email send
- Untick to hold a statement back (the statement is still created as a draft, but the contact won't receive an email)
Select All / Deselect All Use the checkbox in the Send column header to:
- Select all statements for sending (tick)
- Deselect all statements (untick)
This applies to every contact in the run, across all pages, not just the page you are on.
Contacts Without an Email Address If a contact has no email address, their Send checkbox is greyed out and the Email column shows Action Required. Click Action Required to open Edit Email, enter the address and click Save. The contact can then be ticked for sending. A contact with no email address doesn't get a statement, and their invoices for this run are not created at this step.
Checking a Statement Click the Eye icon at the right end of a row to preview that contact's statement as a PDF before sending.
Saving Statements as PDF Click Save as PDF at top right to download a single PDF containing the statements for every contact in the run, for your records.
Sending Statements
When you're ready to send:
- Ensure all desired statements have the Send checkbox ticked
- Verify email addresses are correct for each contact
- Click Send at top right
Clicking Send also creates the invoices for the contacts in the statement run. EPONA shows "Statements are being processed. It may take a couple of minutes" and takes you to the Invoices list. The ticked statements are emailed to their contacts.
Note - unticked contacts get a Draft statement, which you can issue later from the Statements tab of their contact profile. See Contact Profile - Statements. The run is refused if a contact already has an Issued statement with a later As At Date than this run.
Tips
- Use the Eye icon to preview each statement before sending
- If an email address is incorrect, update it in the contact's profile before sending
Navigation
- Click Back at top right to return to the Preview step
- Once statements are sent, the End of Period process is complete